Share

MTB

How to use your Dropper Post Effectively

Are you using your dropper post to its full potential?

Since the introduction of dropper posts a few years back, riders have been raving about this piece of technology that has revolutionised mountain biking.

The idea behind the dropper post is to allow the rider to drop and raise their centre of gravity whilst riding so that you don’t need to stop and adjust your saddle height for different sections of trail. By having this button enabled device on your bike, you’ll never have to stop and interrupt the flow of your ride – or interfere with QoM hunting!

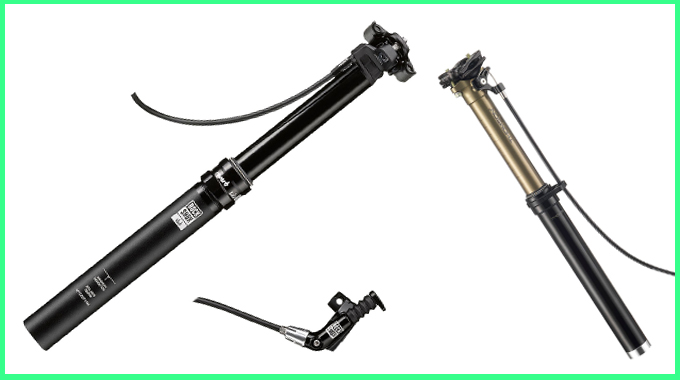
Cabled actuated or hydraulic, dropper posts are seemingly an easy piece of kit to get your head around: push a button and the seat post goes up or down. However, there’s a lot of riding benefit to gain from using your dropper post efficiently.

First and foremost, ensure the dropper post and remote are fitted correctly to your bike. If you’re fitting this yourself, refer to the user manual for instructions. When positioning the button remote on your handlebars make sure it’s in a comfortable position to reach with your thumb.

It’s also a good idea to ensure that the maximum height of the dropper doesn’t raise you high enough to lift your feet off the pedals!

Riding with a dropper post: Going down

Photo: Saskia Dugon Photography

It’s a no-brainer that when you’re heading downhill, off a drop or around some steep corners, you’ll need to get your saddle out of the way. This isn’t just to avoid thigh-bumping your way down a trail, it’s to re-position your centre of gravity.

By lowering your centre of gravity you’re able to improve your stability on the bike, and with the saddle out of the way, your body is able to absorb impact without being bucked off the bike like a game of Buck-a-roo.

Without a saddle in the way, you can move your body around the bike with greater ease. Shifting your weight over the rear hub allows you to stay planted on the bike and avoid an over-the-bar crash.

Riding with a dropper post: Going up

Photo: Saskia Dugon Photography

It’s common to think that if you lower your saddle to go down, then you should raise your saddle to go up. And while many of us ramp up the saddle height to climb and save our knees from unnecessary strain, it’s actually a good idea to lower your saddle slightly when riding over rougher terrain as it will help you absorb some of the shock, and prevent you doing an unintentional endo.

Climbing over features like logs, rocks and other obstacles won’t jolt you forward if your saddle is lowered a little either.

When coming to a stop, it’s common practice to lower your saddle as you brake so that you can plant both feet on the floor, rather than having a wobbly dismount.

You’ll probably find that when riding a trail, you’ll be constantly adjusting your saddle height, but this is necessary to compensate the changes in the terrain. Even though it may seem like a lot of effort, having a dropper post has significant benefits on your riding performance.

You may also enjoy:

Ask the expert: 4 essential MTB skills to learn

How to corner in wet sloppy mud

How to ride rock gardens

Newsletter Terms & Conditions

Please enter your email so we can keep you updated with news, features and the latest offers. If you are not interested you can unsubscribe at any time. We will never sell your data and you'll only get messages from us and our partners whose products and services we think you'll enjoy.

Read our full Privacy Policy as well as Terms & Conditions.

production